
Sea moss gel has quietly become one of the most talked-about natural additions to perimenopause and menopause wellness routines across the UK. Rich in minerals like iodine, magnesium, and potassium, it appeals to women who want to support their bodies without reaching for another supplement bottle. Yet many feel unsure about making it safely at home. Is tap water fine? How long does it last? What if it smells odd? This guide walks you through every stage, from sourcing quality dried moss to blending, storing, and troubleshooting, so you can feel genuinely confident about what you’re putting into your body.
Table of Contents
- What you need before you start
- Step-by-step: The sea moss gel making process
- Understanding method variations: Raw vs cooked sea moss gel
- Safety, storage, and troubleshooting for DIY gel
- What most guides miss about DIY sea moss gel for women 40+
- Where to buy quality sea moss and wellness essentials
- Frequently asked questions
Key Takeaways
| Point | Details |
|---|---|
| Quality ingredients are vital | Sourcing pure, dried sea moss and safe water ensures your gel is safe and effective. |
| Choose a method that fits you | Raw blends maximise nutrients while cooking is ideal for extra safety or gentler flavour. |
| Cleanliness boosts shelf life | Use sterilised glass jars, keep utensils clean, and label batches to avoid spoilage risk. |
| Moderation is key | Stick to 1–2 tablespoons a day and consult your GP if you have thyroid concerns or allergies. |
What you need before you start
Now that we understand why making your own sea moss gel matters for health, let’s check you have everything you need.
Getting the basics right before you begin makes the whole process smoother and safer. Skipping prep steps is where most people go wrong, and for women over 40 who are using sea moss gel for its mineral content, quality really does matter from the very first step.
Ingredients you’ll need:
- Dried sea moss (ideally wild-harvested from a trusted supplier)
- Filtered or spring water, never straight from the tap
- Optional: fresh lime or lemon slices to reduce the ocean aroma during soaking
Essential tools:
- A high-powered blender (a standard blender may leave lumps)
- Sterilised glass jars with tight-fitting lids
- Clean tongs or spoons, ideally metal or silicone rather than porous wood
- A large bowl for soaking
Why does each item matter? Filtering and rinsing removes contaminants, glass storage is best, and your moss source matters enormously for safety. Plastic containers can leach chemicals and absorb odours over time, which is the last thing you want when storing a mineral-rich food. Glass keeps things neutral and clean.
Choosing quality dried moss is equally important. Look for suppliers who are transparent about their sourcing. Wildcrafted Atlantic moss or Caribbean varieties tend to be lower in heavy metals than some farmed alternatives. You can read more about sea moss benefits for women to understand exactly what you’re working with before you start.
For maximum nutrition with sea moss, the prep stage sets the foundation. Rushing it undermines everything that follows.

| Item | Why it matters |
|---|---|
| Filtered water | Removes chlorine and contaminants |
| Glass jars | Neutral, non-reactive storage |
| High-powered blender | Ensures smooth, lump-free gel |
| Quality dried moss | Reduces heavy metal and pollutant risk |
Pro Tip: Sterilise your jars by pouring boiling water inside them and leaving them upside down on a clean towel to dry before you blend. Prepare everything in advance so you’re not scrambling once the moss is ready.
Step-by-step: The sea moss gel making process
With all your supplies ready and clean, follow these straightforward steps to create your gel.
1. Rinse the dried moss thoroughly. Place your sea moss in a colander and rinse under cold filtered water. You’ll likely see small debris, salt, or sand. Rinse until the water runs clear.
2. Soak for 12 to 24 hours. Transfer the rinsed moss to a large bowl and cover generously with filtered or spring water. Add a few slices of lime or lemon to the soaking water. This reduces the natural ocean scent and adds a mild freshness. You’ll notice the moss expand significantly during soaking, which is a good sign it’s hydrating properly.
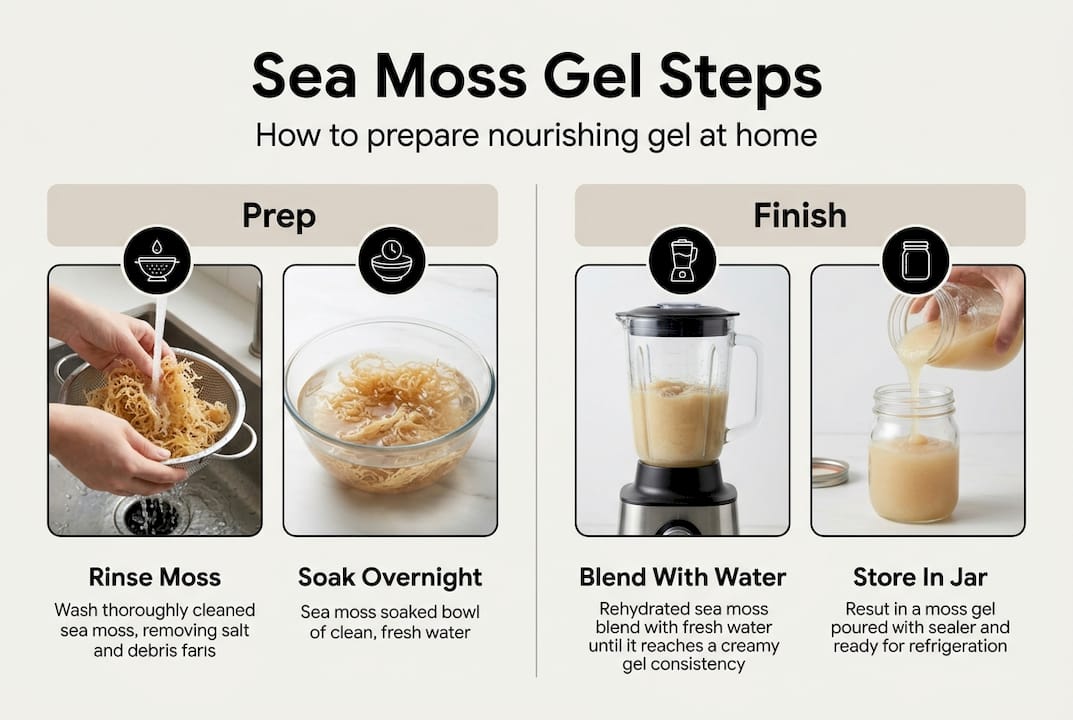
3. Drain and inspect. After soaking, drain the water (don’t reuse it for blending). The moss should feel soft, slightly gelatinous, and have roughly doubled in volume. Discard any pieces that look discoloured or slimy.
4. Blend with fresh water. Add the soaked moss to your blender with fresh filtered water. A good starting ratio is roughly 1 cup of soaked moss to 1 to 1.5 cups of water. Blend on high for 60 to 90 seconds until completely smooth.
5. Adjust texture. If the gel is too thick, add a small splash more water and blend again. Too thin? You’ve likely over-diluted; next batch, use a little less water.
6. Pour into sterilised jars and refrigerate. For complete process details including yield guidance, the gel sets further once chilled. You should have a smooth, slightly jiggly consistency within a few hours.
Safety note: Never use unfiltered tap water for soaking or blending. Chlorine and other additives in tap water can interact with the moss and reduce its quality. Filtered or spring water is non-negotiable.
For shelf life tips and daily use during menopause support, aim for 1 to 2 tablespoons per day added to smoothies, porridge, or warm drinks. If you enjoy experimenting, explore flavoured sea moss gel recipes or browse ready-made sea moss gel recipes for inspiration.
| Stage | Time needed | Key checkpoint |
|---|---|---|
| Rinse | 5 minutes | Water runs clear |
| Soak | 12 to 24 hours | Moss doubles in size |
| Blend | 2 to 3 minutes | Smooth, no lumps |
| Set in fridge | 2 to 4 hours | Gel consistency achieved |
Pro Tip: Blend in smaller batches if your blender struggles. Overloading it produces uneven texture and can leave chunks of unblended moss.
Understanding method variations: Raw vs cooked sea moss gel
Once you know the standard method, you might wonder about variations. Here’s how they compare for nutrient support.
The standard cold-blend method is what most guides recommend, and for good reason. The raw method maximises nutrients while a cooked method improves safety and aroma. Both have a place depending on your priorities.
Raw (cold blend) method:
- Retains the highest level of minerals and natural compounds
- Produces a cleaner, milder flavour
- Requires a longer soak (closer to 24 hours)
- Best for healthy adults with no immune concerns
Gentle-cook method:
- Involves a brief simmer (5 to 10 minutes) before blending
- Reduces any microbial risk, which matters for women with compromised immunity
- May slightly reduce heat-sensitive vitamins
- Produces a softer, less oceanic smell, which some women prefer in the UK’s cooler months
For nutrient retention in sea moss, the raw approach wins on paper. But if you’re new to sea moss, slightly nervous about safety, or going through a period of lower immunity (which perimenopause can sometimes bring), the cooked method is a sensible starting point. You can always switch to raw once you’re more confident.
UK climate also plays a small role. In warmer months, soaked moss can begin to ferment if left at room temperature too long. In summer, keep your soaking bowl in the fridge during the full 24 hours. For sea moss for menopause support specifically, consistency matters more than method.
| Feature | Raw method | Cooked method |
|---|---|---|
| Nutrient retention | Higher | Slightly lower |
| Safety | Good for healthy adults | Better for sensitive individuals |
| Flavour | Mild, clean | Softer, less oceanic |
| Time needed | Longer soak | Shorter overall |
Pro Tip: If you’re just starting out or have any concerns about micro-organisms, begin with the gentle-cook method for your first few batches. Once you feel comfortable, try raw for comparison.
Safety, storage, and troubleshooting for DIY gel
To maximise the benefits and safety of your homemade gel, pay special attention to storage and potential pitfalls.
Homemade sea moss gel is a fresh food product, not a shelf-stable supplement. Treating it that way is essential. Risks including iodine, allergy, and heavy metals are real considerations, and clean storage reduces several of them significantly.
Shelf life:
- Fridge: 7 to 21 days in a sealed glass jar
- Freezer: up to 3 months (portion into ice cube trays first)
Signs of spoilage to watch for:
- Pink or unusual discolouration
- A sour or strongly unpleasant smell (beyond the normal mild ocean scent)
- Visible mould or bubbling
- Slimy texture that feels different from the usual gel
Hygiene habits that matter:
- Never double-dip a used spoon back into the jar
- Always use clean, dry utensils to scoop gel
- Wash hands before handling
- Label each jar with the batch date so you always know how fresh it is
For expert safety guidance on sea moss, the consensus is that less is more, particularly for women with thyroid conditions. Sea moss is naturally high in iodine, and too much iodine can disrupt thyroid function. If you have an underactive or overactive thyroid, speak to your GP before adding sea moss gel to your routine. Similarly, women with shellfish or seaweed allergies should approach with caution.
For sea moss safety in capsule form or when choosing quality moss for DIY, and for trusted sea moss sources in the UK, always check that suppliers provide batch testing or sourcing transparency.
Important: If you notice any unusual reaction after consuming sea moss gel, including skin changes, digestive discomfort, or palpitations, stop use and consult your GP.
Most common mistakes to avoid:
- Using unfiltered tap water for soaking or blending
- Storing gel in plastic containers
- Ignoring spoilage signs and using old gel
- Adding too much water and creating a watery, ineffective product
- Using contaminated or poorly sourced dried moss
Pro Tip: Pour freshly made gel into an ice cube tray and freeze. Each cube is roughly one serving. Pop one into your morning smoothie straight from frozen. It keeps for months and means zero waste.
What most guides miss about DIY sea moss gel for women 40+
Most sea moss guides focus entirely on the process and skip the bigger picture. Here’s what we think matters most for women at this life stage.
Sea moss gel is genuinely useful. It provides minerals that many women over 40 are low in, particularly magnesium and potassium, and it fits easily into daily routines. But it works best as part of a wider, balanced approach to menopause support, not as a standalone fix. No single food resolves hormonal shifts, sleep disruption, or mood changes on its own.
DIY preparation is genuinely empowering. You control the source, the water, the hygiene. That matters. But it also requires you to stay informed and honest about what you’re consuming. The sea moss reality for women is that steady, moderate use within a varied diet is where the real benefit lies. Quick-fix thinking leads to overuse, which is where iodine concerns become relevant.
We’d encourage every woman to speak with her GP before making sea moss a daily habit, particularly if she’s managing thyroid health or taking prescribed medication. Empowerment and caution are not opposites. They work together.
Where to buy quality sea moss and wellness essentials
If you’d rather not make your own, or want to start with quality moss and wellness bundles, here are reliable options.
At Caribella, we’ve made it straightforward to get started whether you prefer to make your own or buy ready-made. Our premium sea moss gels are crafted with the same care and quality sourcing we’d recommend for any DIY batch.
If you enjoy variety, our tasty gel varieties bring Caribbean-inspired flavours to your wellness routine without any of the prep work. For women who want to make their own, our dried sea moss for DIY is sourced with full transparency so you know exactly what you’re working with. Whatever your preference, we’re here to support your wellness journey with products you can trust.
Frequently asked questions
How long does home-made sea moss gel last?
Store sea moss gel in a sealed glass jar in the fridge for 7 to 21 days, or freeze it in portions for several months of longer shelf life.
Can I use tap water to soak or blend sea moss?
Filtered or spring water is always the better choice. Chlorinated tap water can affect the quality of your gel and introduce unwanted contaminants.
Is sea moss gel safe for thyroid or menopause support?
Sea moss gel offers supportive minerals, but its high iodine content may not suit everyone. Always consult your GP, particularly if you have a thyroid condition.
Does blending or cooking sea moss change its nutritional value?
Raw blending maximises nutrients while gentle cooking improves safety. Cooking may slightly reduce some heat-sensitive vitamins but remains a sound option for many women.
What does sea moss gel taste like and how do I avoid a strong ocean smell?
Sea moss gel has a mild, neutral taste with a light ocean aroma. Soaking with citrus such as lime or lemon slices during the prep stage freshens the flavour noticeably.